


这里以做一个用于生成证书的小工具,证书的生成逻辑在远程服务器,工具只是调用接口生成证书,证书生成可参考Springboot集成TrueLicense生成证书&校验证书(含校验Mac地址&CPU序列号&过期时间)
初始化项目
初始化Electron项目可参考快速入门|Eletron,这里Nodejs的版本为20.14.0
这里可能会遇到安装electron失败,推荐使用yarn安装依赖,下面是最终的package.json文件
{
  "name": "ay-license",
  "version": "1.0.0",
  "description": "License生成",
  "main": "main.js",
  "scripts": {
    "start": "electron .",
    "test": "echo \"Error: no test specified\" && exit 1",
    "build": "electron-builder"
  },
  "author": "zhangmy",
  "license": "MIT",
  "devDependencies": {
    "electron": "^32.1.0",
    "electron-builder": "^25.0.5"
  },
  "build": {
    "appId": "com.angyum.license",
    "productName": "Ay证书生成工具",
    "directories": {
      "output": "dist"
    },
    "win": {
      "target": [
        {
          "target": "portable",
          "arch": [
            "x64",
            "ia32"
          ]
        }
      ],
      "icon": "assets/icon.ico"
    },
    "portable": {
      "artifactName": "${productName}-portable-1.8.0.${ext}"
    }
  }
}
package.json定义了软件信息、启动/打包的脚本、相关依赖、打包流程等等。
main.js
看过上面electron快速入门我们知道,electron应用需要一个主入口,在这主入口这我们定义一个窗口用于显示自定义内容
const { app, BrowserWindow } = require('electron');
const path = require('path');

let mainWindow;

function createWindow() {
    mainWindow = new BrowserWindow({
        width: 400,
        height: 600,
        webPreferences: {
            preload: path.join(__dirname, 'preload.js'),
            nodeIntegration: true, // 允许在渲染进程中使用 Node.js
            contextIsolation: false,
            devTools: false // 禁用开发者工具
        },
        autoHideMenuBar: true,  // 自动隐藏菜单栏
    });

    // 加载应用的index.html
    mainWindow.loadFile('index.html');

    // 开启开发者工具
    mainWindow.webContents.openDevTools();

    mainWindow.on('closed', function () {
        mainWindow = null;
    });
}

app.on('ready', createWindow);

app.on('window-all-closed', function () {
    if (process.platform !== 'darwin') {
        app.quit();
    }
});

app.on('activate', function () {
    if (mainWindow === null) {
        createWindow();
    }
});
main.js文件大致定义了窗口大小、preload.js 路径、禁用开发工具、自动隐藏任务栏、加载应用的html
preload.js
// 所有的 Node.js API接口 都可以在 preload 进程中被调用.
// 它拥有与Chrome扩展一样的沙盒。
window.addEventListener('DOMContentLoaded', () => {
    const replaceText = (selector, text) => {
        const element = document.getElementById(selector)
        if (element) element.innerText = text
    }

    for (const dependency of ['chrome', 'node', 'electron']) {
        replaceText(`${dependency}-version`, process.versions[dependency])
    }
})
最后我们还需要一个页面index.html
index.html
<!DOCTYPE html>
<html lang="zh-CN">
<head>
    <meta charset="UTF-8" />
    <meta name="viewport" content="width=device-width, initial-scale=1.0" />
    <title>Ay证书生成工具</title>
    <!-- 引入Bootstrap -->
    <link href="static/bootstrap.min.css" rel="stylesheet">
    <style>
        /* 禁止页面上的文字被选中 */
        body {
            user-select: none;
        }

        /* 允许输入框内的文字可以被选中 */
        input, textarea {
            user-select: text;
        }

        /* 保持按钮可点击,但不允许选择文字 */
        button {
            user-select: none;
        }

        /* 自定义样式使日期选择器中的文本居中 */
        input[type="date"] {
            text-align: center;
        }
    </style>
</head>
<body class="bg-light">
<div class="container mt-5">
    <h1 class="text-center mb-4">Ay证书生成工具</h1>

    <!-- 过期时间选择器 -->
    <div class="mb-3 row justify-content-center">
        <label for="expiryInput" class="col-sm-2 col-form-label text-center">Step 1: 设置过期时间</label>
        <div class="col-sm-4" style="margin-top: 20px">
            <input type="date" class="form-control text-center" id="expiryInput">
        </div>
    </div>

    <!-- 上传机器码文件 -->
    <div class="mb-3 row justify-content-center">
        <label for="fileInput" class="col-sm-2 col-form-label text-center">Step 2: 选择上传文件</label>
        <div class="col-sm-4" style="margin-top: 20px">
            <input type="file" class="form-control" id="fileInput" disabled>
        </div>
    </div>

    <!-- 下载证书按钮 -->
    <div class="row justify-content-center mb-4">
        <div class="col-sm-4 text-center">
            <label for="fileInput" class="col-sm-2 col-form-label text-center">Step 3: 下载证书文件</label>
            <div class="col-sm-4" style="margin-top: 20px">
                <button id="downloadButton" class="btn btn-secondary w-100" disabled>下载证书</button>
            </div>
        </div>
    </div>

    <!-- 提示信息 -->
    <div class="row justify-content-center">
        <div class="col-sm-6 text-center">
            <div id="message" class="alert alert-success">第一步: 设置证书过期时间</div>
        </div>
    </div>
</div>

<!-- 引入Bootstrap的JS和Popper.js -->
<script src="static/bootstrap.bundle.min.js"></script>

<script>
    const expiryInput = document.getElementById('expiryInput');
    const fileInput = document.getElementById('fileInput');
    const downloadButton = document.getElementById('downloadButton');
    const message = document.getElementById('message');
    let certificateBlob = null;

    // 监听用户点击日期选择器
    expiryInput.addEventListener('click', function () {
        message.innerHTML = '第一步: 设置证书过期时间'
    });

    // 监听日期选择器的变化
    expiryInput.addEventListener('change', function () {
        const expiryDate = expiryInput.value.trim();
        if (expiryDate) {
            fileInput.disabled = false; // 启用文件选择
            message.innerHTML = '第二步: 选择机器码文件'
        } else {
            fileInput.disabled = true; // 禁用文件选择
        }
    });

    // 监听点击文件选择
    fileInput.addEventListener('click', async function () {
        fileInput.value = ''
        message.innerHTML = '第二步: 选择机器码文件'
    })

    // 监听文件选择
    fileInput.addEventListener('change', async function () {
        const expiryDate = expiryInput.value.trim();
        const file = fileInput.files[0];

        if (expiryDate && file) {
            const fullExpiryDate = expiryDate + ' 23:59:59'; // 自动拼接时间
            const reader = new FileReader();
            reader.onload = async function (event) {
                const content = event.target.result;
                console.log('文件内容: ', content);

                // 提取 MAC 地址和 CPU 序列号
                const [macAddress, cpuSerial] = content.split(':');

                if (macAddress && cpuSerial) {
                    console.log('MAC地址:', macAddress);
                    console.log('CPU序列号:', cpuSerial);

                    try {
                        // 发送POST请求到API,生成证书
                        const response = await fetch('http://xxx.xxx.xxx.xxx:8008/license/generate', {
                            method: 'POST',
                            headers: {
                                'Authorization': '******',
                                'Content-Type': 'application/json'
                            },
                            body: JSON.stringify({
                                macAddress: macAddress.trim(),
                                cpuSerial: cpuSerial.trim(),
                                expiryTime: fullExpiryDate // 包含过期时间
                            })
                        });

                        if (response.ok) {
                            // 接收文件流
                            certificateBlob = await response.blob();

                            // 生成成功,启用下载按钮
                            downloadButton.disabled = false;
                            // 切换按钮样式为可用状态
                            downloadButton.classList.remove('btn-secondary');
                            downloadButton.classList.add('btn-primary');
                            message.innerHTML = '证书生成成功,点击下载'
                        } else {
                            message.innerHTML = '生成证书失败,请重试'
                        }
                    } catch (error) {
                        message.innerHTML = '生成证书时发生错误,请检查服务器状态'
                    }
                } else {
                    message.innerHTML = '文件格式不正确,请确保内容为 MAC地址:CPU序列号'
                }
            };
            reader.readAsText(file);
        } else {
            message.innerHTML = '请先选择过期时间并选择文件'
        }
    });

    // 下载证书
    downloadButton.addEventListener('click', function () {
        if (certificateBlob) {
            const url = URL.createObjectURL(certificateBlob);
            const a = document.createElement('a');
            a.href = url;
            a.download = 'license.lic'; // 下载证书文件名
            document.body.appendChild(a);
            a.click();
            document.body.removeChild(a);
            URL.revokeObjectURL(url);
        }
    });
</script>
</body>
</html>
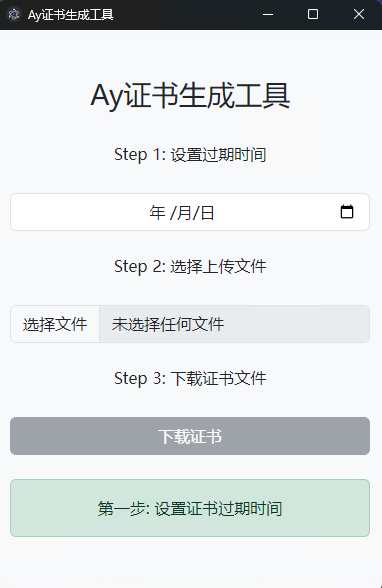
index.html内容为申请生成license的简单页面,页面中使用bootstrap,页面效果如下
本地运行
npm start
打包exe
npm run build
这里打包为一个便携式的软件,不需要安装,打包生成的目录在dist目录下
评论区